Header

Facebook Pinterest Blog Home
Showing posts with label Cook from Scratch. Show all posts

Friday, May 10, 2013

Adding Variety to Your Bulk Food Storage


 I found this insightful Question on the internet yesterday ...Pause to think of what you HAVE and what you might Add for variety to your bulk food storage.
STEP 1:
IF I HAVE: Wheat, Powdered Milk, Coconut Oil, Salt, Honey or Sugar, Water   (Cool - we've done all those in the last 6 months)
I CAN MAKE: Popped Wheat ,Steamed Wheat, Sprouted Wheat, Cooked Cracked Wheat, Tortillas
STEP 2
IF I ADD: Yeast, (or Sourdough Start), Baking Powder, Powdered Eggs, Baking Soda
I CAN MAKE THESE ADDITIONS: Custards, Puddings, Pancakes, Cookies, Waffles, Muffins, English Muffins, German Pancakes, Crepes, Egg Noodles, Pasta, Breads, Biscuits, Crackers, Mayonnaise. A lot more options huh? Keep reading.
STEP 3:
IF I ADD: Butter Buds, Tomatoes, Powdered Cheese
I CAN MAKE THESE ADDITIONS: Meatless Dinners, Meatless Casseroles, Cream Sauces These really add flavor.
STEP 4:
IF I ADD: Unflavored Gelatin, Canned Milk, Canned Fruits
I CAN MAKE THESE ADDITIONS: Jello Salads, Whipped Cream Desserts, Baby Formula, fruit dishes Mmm, now we have desserts.
STEP 5:
IF I ADD: Soup Base, Rice, Legumes (Beans), Beef Broth, Chicken Broth, Alfalfa Seeds, Sesame Seeds
I CAN MAKE THESE ADDITIONS: Hearty Dinner Soups, Chili, Rice Puddings, Refried Beans, Rice Dishes, Fresh Sprouts, Gluten This would really expand your dinner menu in an emergency.
STEP 6:
IF I ADD: Canned Meats, Dried Potatoes
I CAN MAKE THESE ADDITIONS: Dinners, Casseroles, Sandwiches. This may not sound like a lot but a meaty flavor can make all the difference.
STEP 7:
EXTRAS: Oats, Raisin, Nuts, Peanut Butter, Granola, Juices, Corn Starch, Soup Mixes, Spices & Flavorings, Lemon Powder or Juice, White Flour, Cream of Tartar, Junket Rennet Tablet - to make cheeses, Molasses, Karo Syrup, etc. These are small things that you could do without but really add variety to your diet.
What do you cook with? Add it to your food storage.  Share with me what YOUR Can't do without LIST looks like - it will help others.   

Friday, April 19, 2013

Secret Brownie Recipe


I have been craving brownies lately (mostly because I'm trying to stay away from refined sugars) so I decided to try and find a good recipe using coconut oil.
I found one! It is by Thriving Mom, you can visit her blog HERE.
This is what she says about her Secret Brownie Recipe

  • "Everyone who tries my homemade brownies says I have the bestchocolate brownie recipe around. Friends and family always ask me to make my famous brownies. People can't get enough chocolate of my moist brownies. I can't go to a social function without being asked to bring a batch. I'm known around town and my daughter's school as the brownie lady.

    Brownie recipes call for either oil, shortening, or butter. I tried many different brownie recipes of each kind. Personally, I am rather fond of the butter recipes, but my husband and all our family and friends think I've found a real winner with an oil based brownie recipe.

    Why is it so yummy? Because I use coconut oil instead of the usual vegetable oil.

    Now, I know what you're thinking...and no, it doesn't make the brownies taste like coconut any more than using vegetable oil would make them taste like vegetables. There is just something supremely rich about the coconut oil that adds a ton of flavor.

    This coconut oil brownie recipe makes a super moist brownie that's almost fudge like, but the chocolate taste is rather mild. This combination makes a divinely moist brownie that can be devoured since it is not overly rich."
You will find the Secret Brownie recipe HERE. 
I'm going to try it out today, if you do too let me know what you think.

Wednesday, April 10, 2013

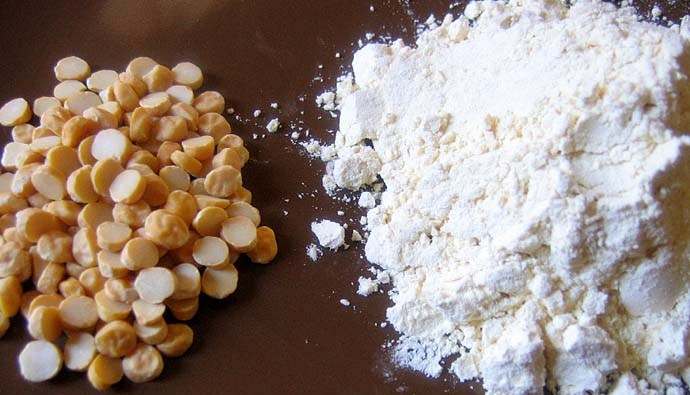
Make Your Own Chickpea Flour


You will find in some Indian, Turkish, Italian, Spanish and French recipes that it will ask for chickpea flour. But finding a store that stocks chickpea flour can be difficult. Here is how you can make your own in little to no time at all.
Chickpea flour — also known as besan, gram flour, channa flour, harina de garbanzo — is a popular ingredient in many Old World cuisines. It is the used in the batter for Indian pakoras. The French of Provence make a popular bread called soccawith it that they bake in wood-fired ovens. Persian Jews mix it with ground chicken to form gundi dumplings. Chickpea flour can also be a great substitute for wheat flour in many recipes and for thickening sauces. Good news for those who want to go gluten-free!
Here's how to make your own. It should yield around 1 1/2 cups.

Chickpea Flour Recipe

  • 2 cups of dried chickpeas
  1. Add the chickpeas in small batches to a food processor, coffee grinder or blender and process until pulverized and smooth.
  2. Run through a sieve to remove any large particles. Use as directed in recipes.
  • Toasted Chickpea Flour: toast the chickpeas in a 400°F oven for 15-20 minutes, or until the chickpeas start to give off a toasted aroma and are lightly browned. Cool and proceed with the recipe above.

Tuesday, April 9, 2013

What is Chickpea Flour?


In the United States, most people automatically think of wheat when a recipe calls for flour, but ground wheat is only one type of flour among dozens. Chickpea flour adds a nutty taste to baking, soups and sauces, and can substitute for wheat flour in most recipes. Both wheat-free and gluten-free, chickpea flour is also easier to digest than other wheat-flour substitutes, such as soy flour.


Identification

Chickpea flour is nothing more than dried chickpeas, ground to a flour-like consistency. Other names for chickpea flour include gram flour, cici flour and garbanzo bean flour. Besan is chickpea flour made with unroasted chickpeas. Chana is flour made from roasted chickpeas.

Nutritional Facts

One cup--92g--of chickpea flour provides 356 calories, including 52 calories from fat. A 1-cup serving of chickpea flour also contains 6g of total fat, 1g of saturated fat and no trans fat. With 53.2g of total carbohydrate, a cup of chickpea flour provides 18 percent of your recommended daily value--DV--of carbohydrate and 40 percent of the recommended DV of dietary fiber, as well as 41 percent of the recommended DV of protein. When you eat a 1-cup serving of chickpea flour, you'll also be getting vitamin A, vitamin K and several B-complex vitamins, including thiamin, riboflavin, niacin, pantothenic acid and a full day's supply of folate. Chickpea flour provides 25 percent of the DV for iron, 74 percent of the recommended DV for manganese, and various amounts of other trace elements and minerals, including calcium, magnesium, phosphorus, potassium, sodium, zinc, copper and selenium.


Availability

If your grocery store has an extensive international foods section, you may find chickpea flour in the Indian foods section under the names gram flour, besan or chana flour. Most groceries that sell Indian foods and ingredients carry chickpea flour, since it's a main ingredient in many Indian foods. Health food stores also carry a variety of non-wheat and gluten-free flours, often including chickpea flour. If you can't find chickpea flour locally, look for it through a health food supplier or co-op online.


Using Chickpea Flour in Recipes

Substitute 7/8 cup of chickpea flour for 1 cup of wheat flour for most baked goods. For yeast-raised breads, use 1 part chickpea flour to 4 parts wheat or spelt flour, says Margaret Wittenberg in "Good Food: The Complete Guide to Eating Well." In recipes that use flour for thickening, substitute chickpea flour for wheat flour or cornstarch on a one-to-one ratio. Use toasted chickpea flour for baking, Wittenberg advises, and untoasted for soups, fritters and dips such as hummus.


Read more: http://www.livestrong.com/article/160151-chickpea-flour-facts/#ixzz2PzLrWY6O

Friday, April 5, 2013

Crispy Roasted Chickpeas (Garbanzo Beans) - Recipe

Don't these look so yummy. These are Crispy Roasted Chickpeas and they are super easy to make. You only need 4 ingredients. Please go HERE to get the recipe and step-by-step instructions (with pictures).
You won't be sorry!

Wednesday, April 3, 2013

Whole Wheat Bread Recipe WITH Coconut Oil!?


WHOLE WHEAT BREAD

Put all of these ingredients in Bosch and mix well:

9 Rounded Cups fresh ground hard wheat
2 T Salt
½ C Powdered milk

Add:
½ C Expeller Pressed Coconut Oil (or oil of your choice)
½ C honey (or sugar of your choice)
2 T Lecithin (supplement)
3 Eggs
5 C of very hot water

Turn mixer on an d as soon as dry ingredients are moistened add 2 ½ rounded T of
LeSaffe dry yeast while mixer is running. You may need to add up to 3 C of WHITE
flour while it is mixing if the dough doesn’t begin to clean the sides of the bowl. Keep it
“sticky” – makes a better loaf.. Mix for 10 minutes on 3 speed.

Take the dough hook out and cover the dough in the bowl; let set until dough rises to the
top of the lid.

Put out on floured surface and divide into 6 loaves. Form into loaves and put into large
non stick pans. Cover and let rise in warm place. (If not using non stick pans it works
best if you put some type of oil or shortening in the pans).

Let raise until double (or light). Bake at 350 degrees for 35 minutes (ovens vary).

Monique Jackson's Wheat Bread Recipe


Monique Jackson’s Wheat Bread – September 2009


6 C warm water
2 T Vital Wheat Gluten
3/4 C oil
2 T Powdered Milk or Instant Milk
3/4 C honey
2 T Dough Enhancer
2 T yeast
2 T Salt
15 C wheat flour

Put all 8 ingredients in Bosch with 6 ups of ground wheat flour and mix on speed 1 for 1
minute. Watch to see that the yeast is active and forming bubbles. Add 9 C of remaining
wheat flour. Mix for 10 minutes. Butter counter, put dough on counter with butter side
up and let rest 10 minutes. Cut into 4 equal sections and mold into 4 buttered 2 pound
loaf pans. Turn oven on to 170 degrees for one minute and then turn oven off. Place
pans in oven and set timer for 30 minute. After 30 minutes turn oven to 350 degrees
leaving pans in oven while it warms to 350 degrees. Bake for 34 minute.

•    I’ve even baked this in a Solar Oven & it turns out fabulous!

Monday, April 1, 2013

Brown, Green, and Red. Is there a difference?


There is a broad variety of lentils, but here are the most common kinds of lentils we see in stores:
Brown Lentils - This is by far the most common variety of lentil, and probably the one that you see at your local grocery store. They can range in color from khaki-brown to dark black, and generally have a mild earthy flavor. They cook in about 20-30 minutes and hold their shape very well. Common varieties are Spanish Brown, German Brown, or Indian Brown. The blackest and tiniest lentils you find are usually Beluga lentils, which have a rich and deeply earthy flavor.
Green Lentils - These can be pale or mottled green-brown in color with a glossy exterior. They have a strong, somewhat peppery flavor. Green lentils generally take the longest to cook, upwards of 45 minutes, but they keep a firm texture even after cooking. This makes them ideal for salads and other side dishes.
Red Lentils - With colors ranging from gold to orange to actual red, these are the sweetest and nuttiest of the lentils - to our mind, at least! They're somewhere in the middle in terms of cooking time and are usually done in about 30 minutes. They tend to get mushy when cooked through, so they're perfect for curries, or for thickening soups. A few varieties are Red Chief and Crimson, and you'll often find them in Indian or Middle Eastern markets labeled as masoor (red lentils) or channa (yellow lentils).
Do you have a favorite kind of lentil? What do you like to make with them?

Saturday, March 30, 2013

Lentils Part 2 with Tasty Recipes


Lentils can help keep your digestive system working “regularly”, help you keep blood sugar levels healthy, and help you keep healthy cholesterol levels. How? The fiber they contain is both soluble and insoluble. Fiber also helps keep you fuller longer, which helps you eat less. While you can buy canned lentils, they are so easy to cook from dried that I really encourage you to give it a try. Here’s a basic recipe:
  • 1 cup washed and drained lentils
  • 3 cups water
  • Sea salt and pepper
Bring lentils and water to a boil. Reduce heat; cover and simmer until tender, about an hour. Drain excess liquid if needed. Add seasonings to taste. While lentils are for more than just soup, it can be a great place to start. Here are a couple to get you started: Hearty Lentil Soup and Lentil Soup with Smokey Ham. And here are some “more than soup” ideas:


  • Cook up this delicious Slow Cooker Chickpea and Lentil Stew while at work one day.
  • Stuff cooked and seasoned lentils into pita bread with sprouts and veggies for a great sandwich.
  • Roll them up in whole grain tortillas with avocado slices and fresh tomatoes.

Friday, March 29, 2013

Facts on Lentils


Lentils are the world’s oldest cultivated legume, appearing on the scene somewhere in the neighborhood of 7000 BCE! The name comes from the fact that the shape of a “len”til looks like the “len”s of an eye. And, like eyes, lentils vary in color ranging from black to brown to reddish orange, coral, gold and slate green. They’re easy to prepare and cook more quickly than many other legumes. Different varieties have different textures and are generally used in different types of recipes. For example, brown and green lentils hold their shape well and are great for casseroles, salad, or to ladle over grains or potatoes, whereas split red or yellow lentils disintegrate easily when cooking and are perfect for soups and stews. Adding lentils to your diet is a tasty way to improve your health. Consider that they are high in fiber, packed with plant protein, low in fat and low on the glycemic index, which means they don’t cause a spike in blood sugar after eating. The USDA Nutritional database shows that one cup of cooked lentils contains:
  • 220 calories
  • 17 grams of protein
  • Less than 1 gram of fat
  • 15 grams of fiber
  • 0 cholesterol
  • Iron, phosphorus, folate and plenty of other good stuff

Friday, March 1, 2013

Store what you Eat

Hey - it's a scary thing to try to figure out how to feed yourself, much less a family with what is sitting (or not sitting) in your cupboards and maybe a pantry.   Here are my top 10 ways to just get STARTED ...

1.  PLAN:  Get a notebook and write down your plans; your goals; your wish lists.  Keep it simple. 

2.  DOUBLE UP:  Buy double the ingredients of a few meals each week so that you have a "meal in the cupboard" for back-up.

3.  SCRATCH:  Learn to cook from scratch.  I can't say this often enough ... learn to cook from scratch.  This could be the difference between starving and not ... commit to stop paying someone else to cook and package meals for you. 


4.  RELATIONSHIPS:   Make it a family effort when possible.  Bring your children into the experience.  Squash that pride and show up to learn from the "older" women in your family, neighborhood or church.  Ask questions, take notes and learn from their mistakes so you don't have to repeat them. 

5.  TOOLS:  Use a basic food storage calculator to figure out the basics of what a human needs to "not starve."

6.  MODIFY:  Now modify the calculator's results to match what your family EATS.  Remember the little things like seasonings and spices that make meals more palatable.


7.  FUN:  Get on Youtube and Google and teach yourself HOW to do things you don't know how to do.  Technology can be such a blessing!

8.  GADGETS:  Include the simple gadgets you'll need to help you cook your foods. 

9.  GARDEN/CANNING:  You'll be healthier if you can grow gardens & bottle foods.  Make every effort to learn how to do this.  Not all at once; just work it in.


10.  KNOWLEDGE:  Be an eager, humble learner.  Those who know HOW will survive and thrive!


COMMIT to START where you ARE ... lots of little bits can make a HUGE difference!

"No one is responsible for my choices but me.  If I'm unprepared it's because I chose to be." - Robin