

Tips:
- Do this as quickly as you can from harvest. IF there is going to be a delay from when it's picked to when you can process your corn; put it in the FRIDGE or in a cooler with ice as the sugars break down quickly at room temperature.
- We do this whole process outside, usually in the evening when it's a bit cooler. You can do it inside too on a smaller scale.
- We also LOVE using a propane outdoor cooker - much faster than trying to navigate pots on a stove for the volume that we do. But again, inside on the stove in smaller quantities would be fine too.
P.s. get your family involved - knowing how to do simple things like this is sooo important!
Corn
Large pot of boiling water
Large bucket of cold ice water (we use a chest cooler because it's usually so hot outside)
Food saver style vacuum sealer OR simply use ZIPLOC "freezer" bags
Sharp Knife (or other corn cutting device)
Cutting board, cookie sheet or cake pan (something to keep the corn from flying all over the place when you are cutting off the cob).
Dish towels just to clean up
STEP 1: Get your BIG pot and fill it 3/4 full with water. Turn it on High and get that water hot.
STEP 3: Blanch it. All fruits and vegetables contain enzymes that, over time, break down the destroy nutrients and change the color, flavor, and texture of food during frozen storage. Corn requires a brief heat treatment, called blanching, in boiling water or steam, to destroy the enzymes before freezing. Blanching times generally vary from one to 10 minutes, depending on the vegetable. The duration should be just long enough to stop the action of the enzymes.

- Begin counting the blanching time as soon as you place the corn in the boiling water, noting that the water ought to return to a boil in a minute or less. If it takes several minutes or more to return to a boil, you are using too small a pot or adding too much corn.
- Cover the kettle and boil at a high temperature for the required length of time. You may use the same blanching water several times (up to 5). Be sure to add more hot water from the tap from time to time to keep the water level at the required height.
- Blanching time varies depending on the type of frozen corn you are making: cut-whole kernel, cream style or corn-on-the-cob.
- Blanching times, for freezing the corn: Whole Kernel Corn. - 4 to 6minutes. Cream style corn - 4 to 6 minutes.
STEP 4: Once the corn is blanched, take it out of the water and place it in your bowl, bucket or cooler of ice water. Let it set in there and get good and cold. A good rule of thumb is to leave them in the cold water as long as you had them in the hot water, so if it took 7 minutes to blanch them then leave them in the cold water for 7 minutes. We aren't that technical at my house - we are usually cutting while all the other stuff is happening so we just reach to the bottom and get the coldest ones out next to cut.
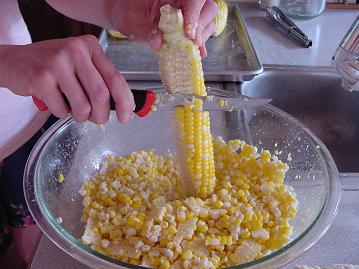
STEP 5: Cut the kernal's off the cob. If you do that in a large cookie sheet or sheet cake pan; the corn is easier to "capture" but I'm sure you can figure it out.
STEP 6: Scoop up the corn and put in a baggie and get as much air out as you can. We put 2 cups in per quart size baggie; that seems to be a good measurement for us. Lay it flat, seal it most of the way across at the top and then roll gently from the bottom to squeeze as much air out as you can before you give it that final seal.

STEP 7: Lay them flat on another cookie sheet and plop them in the freezer.
TIP: Don't stack your corn baggies too high until they are completely frozen otherwise the corn that is in the middle won't freeze quickly and could potentially go bad while it's freezing. Once the baggies are frozen you can stack them as high as you need to.
No comments:
Post a Comment