Header

Facebook Pinterest Blog Home

Sunday, August 18, 2013

What do you know about CORN?

According to Widipedia:  (which of course knows everything) ...  Sweet corn occured as a spontaneous mutation in field corn and was grown by several early Native American tribes.  The Iroquois gave the first recorded sweet corn (called Papoon ... kind of like that name) to European Settlers in 1779.  It soon became a popular food in southern and central regions of the United States.

Open pollinated varieties of white sweet corn started to become available in the U.S. in the 19th Century.  Hybridization, which is what we see most of now, allows for more uniform maturity, improved quality and disease resistance.  This is not to be confused with GMO.  Do your own research between hybrid's and GMO's to gain a greater understanding of what can impact our foods.

Anyway - back to the corn.  We have the opportunity to get Sweet Corn grown in Enterprise for the next few weeks.  Serendipity is the sweet corn we will be receiving.  Corn evokes powerful memories in me, everything from crunching down on a sweet cob of corn as a child; tasting the ice cold creaminess of brazillian milho verde (corn ice cream) to driving through the corn fields of Nebraska and being pelted by giant field bugs as they hit our wind shield.  Not a pretty site --

Well, when you get tired of eating your baggies of frozen corn ...  here's a few NEW recipes for you  --  Corn Pudding and Corn Ice Cream ...  This next recipe was revised from The Technicolor Kitchen Blog


This corn pudding is traditionally served during the June Festival in Brazil. It's a sweet pudding made from corn, milk, and sugar, sprinkled with cinnamon, and served cold.

Prep Time: 20 minutes

Cook Time: 15 minutes

Total Time: 35 minutes


Ingredients:
  • 6 ears of fresh corn
  • 3 cups of milk
  • 3/4 cup sugar
  • pinch of salt
  • 3 tablespoons butter
  • cinnamon
Preparation:
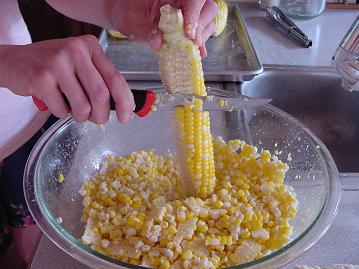
  1. Scrape the kernels off of the ears of corn.
  2. Place the corn in a blender (or food processor) with the milk, and blend well, for at least 3 minutes.
  3. Strain the corn/milk mixture through a fine mesh sieve into a pot. Discard the fibrous parts of the kernels that remain in the sieve.
  4. Add the sugar, a pinch of salt, and the butter to the pot, and bring mixture to a simmer.
  5. Cook, stirring continuously, until the mixture becomes thick and creamy, about 15 minutes. If it's thick enough, you should be able to drag a wooden spoon across the bottom of the pot and see the bottom for several seconds before the mixture closes in on itself.
  6. Remove from heat and let cool. Pour pudding into a serving dish. Sprinkle with cinnamon.
  7. Chill thoroughly, and serve cold.


Sweet corn ice cream

1 can (200g) corn kernels, drained and rinsed (this is a scant 1 Cup Measurement of Corn Kernels, cooked on the cob first and then cut off - I have also seen this recipe done with corn "uncooked" seems like you'd get more "corn cream" if it was cooked a bit.
1 ¼ cups (300ml) whole milk
1 can (395g) sweetened condensed milk
1 cup (240ml) heavy cream
¼ teaspoon ground cinnamon
pinch of salt

Place the kernels and milk in a blender and blend until smooth. Push mixture through a sieve and put it corn "cream" back in the blender. Add the sweetened condensed milk, heavy cream, cinnamon and salt and blend.
Pour into a metal/glass bowl, cover and refrigerate for at least 2 hours, then freeze in your ice cream maker according to the manufacturer’s instructions.
Transfer ice cream to an airtight container and put in the freezer until firm, at least 4 hours, before serving.

... gotta run, looking at all this food is making me hungry! 


Saturday, August 17, 2013

FREEZE it for later ... CORN

Here's a quick tutorial on how to FREEZE the fresh corn you have access to NOW.   This corn will taste much, much better than it's frozen store-bought counterparts and more importantly you will KNOW where it came from and what's in it.  It's really quite fast and easy if you have the space in your freezer to keep it. 


Tips:
  •     Do this as quickly as you can from harvest.  IF there is going to be a delay from when it's picked to when you can process your corn; put it in the FRIDGE or in a cooler with ice as the sugars break down quickly at room temperature.

  •     We do this whole process outside, usually in the evening when it's a bit cooler.  You can do it inside too on a smaller scale.

  • We also LOVE using a propane outdoor cooker - much faster than trying to navigate pots on a stove for the volume that we do.   But again, inside on the stove in smaller quantities would be fine too.
    P.s. get your family involved - knowing how to do simple things like this is sooo important!
 
 
You will need:

    Corn
    Large pot of boiling water
    Large bucket of cold ice water (we use a chest cooler because it's usually so hot outside)
    Food saver style vacuum sealer OR simply use ZIPLOC "freezer" bags
    Sharp Knife (or other corn cutting device)
    Cutting board, cookie sheet or cake pan (something to keep the corn from flying all over the place when you are cutting off the cob).
    Dish towels just to clean up


STEP 1:  Get your BIG pot and fill it 3/4 full with water.  Turn it on High and get that water hot.


STEP 2:  While the water is heating, take the husks off your corn (sometimes you will find worms at the top of the corn; just wack off the top 1 or so of the cob when you see them; not a big deal, it just means your corn wasn't sprayed to death with pestacides - that is a GOOD thing).  Get off as much silk as you can either with your hands or a soft vegetable brush.

STEP 3:  Blanch it.  All fruits and vegetables contain enzymes that, over time, break down the destroy nutrients and change the color, flavor, and texture of food during frozen storage. Corn requires a brief heat treatment, called blanching, in boiling water or steam, to destroy the enzymes before freezing. Blanching times generally vary from one to 10 minutes, depending on the vegetable. The duration should be just long enough to stop the action of the enzymes.

  •      Begin counting the blanching time as soon as you place the corn in the boiling water, noting that the water ought to return to a boil in a minute or less. If it takes several minutes or more to return to a boil, you are using too small a pot or adding too much corn.
  •     Cover the kettle and boil at a high temperature for the required length of time. You may use the same blanching water several times (up to 5). Be sure to add more hot water from the tap from time to time to keep the water level at the required height.
  •     Blanching time varies depending on the type of frozen corn you are making: cut-whole kernel, cream style or corn-on-the-cob.
  • Blanching times, for freezing the corn: Whole Kernel Corn.  - 4 to 6minutes. Cream style corn - 4 to 6 minutes.

STEP 4:  Once the corn is blanched, take it out of the water and place it in your bowl, bucket or cooler of ice water.  Let it set in there and get good and cold.  A good rule of thumb is to leave them in the cold water as long as you had them in the hot water, so if it took 7 minutes to blanch them then leave them in the cold water for 7 minutes.  We aren't that technical at my house - we are usually cutting while all the other stuff is happening so we just reach to the bottom and get the coldest ones out next to cut.

STEP 5:  Cut the kernal's off the cob.  If you do that in a large cookie sheet or sheet cake pan; the corn is easier to "capture" but I'm sure you can figure it out.

STEP 6:  Scoop up the corn and put in a baggie and get as much air out as you can.  We put 2 cups in per quart size baggie; that seems to be a good measurement for us.  Lay it flat, seal it most of the way across at the top and then roll gently from the bottom to squeeze as much air out as you can before you give it that final seal.
 

STEP 7:  Lay them flat on another cookie sheet and plop them in the freezer.

TIP:  Don't stack your corn baggies too high until they are completely frozen otherwise the corn that is in the middle won't freeze quickly and could potentially go bad while it's freezing.  Once the baggies are frozen you can stack them as high as you need to.

Friday, August 2, 2013

Tomatillo's - The Secret Ingredient

I love - love - love tomatillo's.  Probably because they are so easy to grow and are the "secret ingredient" for all the green sauces I really like.  The tomatillo is a green, tomato-shaped vegetable covered by a papery husk native to Central America.  Tomatillo's provide that tart yummy flavor in green salsa's and tomatillo dressings.  I always thought green tomatoes were the way to make chile verde ... NOT - it's the tomatillo.  


Besides just being scrumptious and yummy ... Tomatillo's give us lots of vitamin C, potassium and fiber.  I knew there was a reason why I loved green salsa.  And if this wasn't reason enough to love this little green beauty - they are super easy to use; pretty much a no brainer to use fresh or put up for later.  I'm going to start this post with the "copycat" Cafe Rio Tomatillo Ranch dressing because I pretty much "drink" that stuff .... then I'll post how to preserve it for later.


Tomatillo Ranch Copy-cat Cafe Rio Recipe

  • 2 cups ranch dressing (I usually use a packet of Hidden Valley Ranch buttermilk mix, but you can make your own Homemade Buttermilk Ranch Dressing or Buttermilk Dressing if you prefer)
  • 1/2 C chopped Cilantro (you'll want to use the leaves - not the stems)
  • 4 tomatillos (remove the paper husk)
  • minced garlic (1/2 tsp.)
  • 2 tbsps fresh lime juice
  • 1 jalapeno pepper (this gives it a little heat - not too much)
Blend it all up in the blender and you're good to go.  


Next try your hand at some Chile Verde Sauce over a pork shoulder - you're going to wish you'd tried this "like yesterday" ...


Chile Verde Recipe  (by Elise Bauer)

  • 1 1/2 pounds tomatillos
  • 5 garlic cloves, not peeled
  • 2 jalapenos, seeds and ribs removed, chopped
  • 2 Anaheim or Poblano chiles (optional)
  • 1 bunch cilantro leaves, cleaned and chopped
  • 3 1/2 to 4 pounds pork shoulder (also called pork butt), trimmed of excess fat and cut into 1 to 2-inch cubes
  • Salt
  • Freshly ground black pepper
  • Olive oil
  • 2 yellow onions, chopped
  • 3 garlic cloves, peeled and finely chopped
  • 2 Tbsp of chopped fresh oregano or 1 Tbsp of dried oregano
  • 2 1/2 cups chicken stock
  • Pinch of ground cloves

Method

chile-verde-1.jpg chile-verde-2.jpg
chile-verde-3.jpg chile-verde-4.jpg
1 Remove papery husks from tomatillos and rinse well. Cut in half and place cut side down, along with 5 unpeeled garlic cloves, on a foil-lined baking sheet. Place under a broiler for about 5-7 minutes to lightly blacken the skin. Remove from oven, let cool enough to handle.

If you want the additional flavor of chiles other than jalapenos, you can add a couple Anaheim or poblano chiles. Either use canned green chiles or roast fresh chilies over a gas flame or under the broiler until blackened all around. Let cool in a bag, remove the skin, seeds, and stem.

chile-verde-6.jpgchile-verde-5.jpg

2 Place tomatillos, skins included, into blender. Remove the now roasted garlic cloves from their skins, add them to the blender. Add chopped JalapeƱo peppers, other chilies (if you are using them), and cilantro to the blender. Pulse until all ingredients are finely chopped and mixed.

chile-verde-7.jpg

3 Season the pork cubes generously with salt and pepper. Heat olive oil in a large, heavy-bottomed skillet over medium high heat and brown pork chunks well on all sides. Work in batches so that the pork is not crowded in the pan and has a better chance to brown well. Using a slotted spoon or tongs, lift pork out of pan and place in bowl, set aside.

4 Pour off excess fat, anything beyond a tablespoon, and place the onions and garlic in the same skillet and cook, stirring occasionally until limp, about 5 minutes. If your skillet is large enough to cook the entire batch of chile verde, with the sauce and meat, then add the pork back to the pan. If not, get a large soup pot and add the onion mixture and the pork to it. Add the oregano to the pan. Add the tomatillo chile verde sauce to the pork and onions. Add the chicken stock (enough to cover the meat). Add a pinch of ground cloves. Add a little salt and pepper. (Not too much as the chile verde will continue to cook down and concentrate a bit.)

chile-verde-10.jpg chile-verde-11.jpg
5 Bring to a boil and reduce to a slight simmer. Cook for 2-3 hours uncovered or until the pork is fork tender.

Adjust the seasoning to taste with salt and pepper. Serve with Spanish rice and warmed flour tortillas or freshly made corn tortillas.

Enjoy!